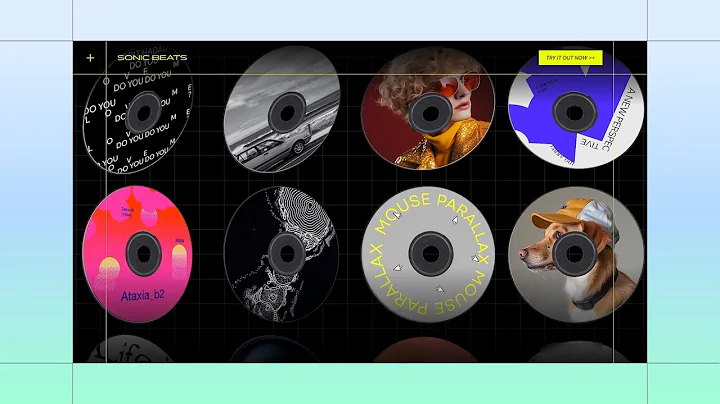
Build along to create an interactive section with a mouse parallax effect
Build Along to Create an Interactive Section with a Mouse Parallax Effect
Hey there, fellow design enthusiast! Ready to dive into a world of depth and interactivity? Today, we're going to explore the ever-captivating realm of mouse parallax effects. Imagine your designs coming to life, with elements twirling around, responding delightfully as you move your cursor. It’s all about creating instant depth and immersion—perfect for captivating your audience.
So, cozy up, maybe grab a cup of coffee, and let’s get started on this design journey together!
The Magic of Mouse Parallax
First things first. What is this mouse parallax effect we keep raving about? At its core, parallax is a fun way to add depth and a sense of 3D to your designs by having layers move at different speeds. This specific type of parallax—guided by the mouse—makes objects subtly shift as you move your cursor, creating an interactive and engaging experience.
Think of it as a layered scene that sways gently, almost like trees in a breeze, with each element telling its own visual story. No need for major coding skills here. We’ll use a simple CSS grid, some neat animations, and interactive effects to achieve this.
Step-by-Step Guide to Creating Mouse Parallax
Before we get to the nitty-gritty details, here’s a quick preview of our project: we’ll build an interactive section where discs swivel magically as they follow the cursor. Ready? Let’s go!
Set Up Your Canvas
1. Create a Blank Section
Start by crafting a blank section within your design tool or website builder. This will be your playground.
2. Apply CSS Grid
Head over to the Inspector panel and set up a CSS grid. This time, we’ll keep it simple and use 4 columns and 3 rows, providing you a flexible layout to play around with.
Bring Your Images to Life
Here’s where the fun begins!
3. Add Your First Image
Time to introduce your first visual element. Select an image and position it into the top-left cell of your grid. In the settings, ensure to keep the image ratio intact. Oh, and make sure to set the width to a responsive 100%. Advanced sizing should be enabled here—if not, flip that switch on.
4. Adjust Grid Sizing
Let's fine-tune our grid a tad more. Set the height for your first row to `max-content` so that the row height adjusts to your image’s dimensions.
Additional Visual Elements
It's all coming to life piece by piece.
5. Add More Images
Select your next image, say a gray disc, and slot it into the second row, third column. Repeat the settings adjustments—keep the aspect ratio, set it to 100% width, and make that row’s height `max-content`.
6. Design Nested Layers
Get creative! Layer your images for a delightful effect. Grab an SVG (like a circular text) and place it on top of the gray disc. Consistency is key here. Ensure the element's width and height are both set to 100%.
Animation Time!
7. Animate the Text
Now it’s time to sprinkle some animations. Apply a looped spinning animation to your text SVG. Fiddle with the duration settings to slow it down, ensuring a mesmerizing effect that grabs the viewer’s attention.
Tie It All Together
Onwards to additional design elements.
8. Add and Adjust More Elements
Insert any additional images or elements—like a fun mouse image stationary over the text. Again, ensure the proportions remain intact, and size to fit.
9. Group The Elements
Highlight all your newly added elements and nest them neatly within a container. This organization trick keeps your workspace tidy and interactions smooth.
The Interactive Magic
Drumroll, please.
10. Apply Mouse Effects
The moment we've been waiting for! Select your container and add a mouse effect, choosing “Tilt 3D” for that parallax magic. Apply a similar effect to your other images, ensuring an angle of around 41 degrees and a velocity of 1. Voilà!
Final Touches
11. Background Matters
Change up your background’s color or add an engaging background image, enhancing the overall aesthetic.
12. Preview and Tweak
Take a step back, glance at your creation, and make those final tweaks for perfection.
Wrapping Up
Congratulations! You did it! With mouse parallax, you’ve added an elegant touch, introducing a burst of vitality to your web designs. Doesn’t it feel rewarding seeing everything mesh seamlessly?
Creating dynamic visuals is just the start. At NewForm, we’re all about honing your design skills, helping you find opportunities in the marketplace, and connecting you with industry leaders. We offer monthly web design challenges with cash prizes, weekly skill-building events, and exclusive monthly guest sessions featuring top web design professionals. Here, you get to learn directly from the best, access invaluable resources, and build cool things online.
So, if you’re ready to take your skills to new heights and join a community of like-minded creatives, now’s the time! Head over to NewForm for more amazing opportunities.
Catch more tutorials like this and stay inspired. Until next time, happy designing!


